الأربعاء، 27 يناير 2016

مجموعة من كتب pic microcontroller للمبتدئين و للمحترفين

  • A set of books pic microcontroller for beginners and professionals              
        من يريد ان يبدأ في الميكروكنترولر فليبدأ بالكتابين :
Teach Yourself PIC Microcontrollers For Absolute Beginners .
Teach Yourself PIC Microcontrollers For Absolute Beginners.jpg

PIC BASIC Projects 30 Projects Using PIC BASIC and PIC BASIC PRO
330a9c8ebe4d40be11f1f215be1baa44-d.jpg

ومن يريد تعلم السي يوجد كتابين بهم شرح وافي للسي الخاصة بالميكروكنترولر :
Exploring C for Microcontrollers A Hands on Approach
58051bf8ef03af5a90d3913ed590ddb3-d.jpg

Advanced PIC Microcontroller Projects in C
43982a26c5a089b276ec8930bfc3a2d0.jpg


وهذه كتب اخرى
Basic for PIC Microcontrollers
a31a6c6f5447598cd052e1a7cadbb1f0.jpg

PIC Microcontrollers: An Introduction to Microelectronics
4824e4aee0828a1c4c0b37f7b1db5d68-d.jpg

الاثنين، 25 يناير 2016

تطبيق لمشاهدة القنوات الفضائية بدون أنترنت ولا رصيد على هاتفك مجانا 2016


قـد يــرغب العديد من مستخدمي الهواتف الذكية مثل الأندرويد بمشاهـدة ومتابعة بـرامجهم التلفزية وقنواتهم المفظلة فمن من ينكر ذالك؟
    في هذه التدوين باذن الله سأشـارككم تطبيق Belhind TV الذي يــمكنك من مشاهدة ومتابعة باقة تتكون من العديد من القنوات الفضائية الأجنبية والعربية وأيضا الــمغربية وهــنـا أتحدث عن جميع القنوات المغربية TNT وأيضا العديد من القنوات لمشاهدة الأفلام وهناك أيضا قنوات رياضية لبث المباريات .. بدون اطالة في الشرح ..
    
  •       أنــت متشوق لكي تتعرف على التطبيق ؟ 
  •      تــريد تـبيث التطبيق عــلى هاتفك والاستمتاع بمشاهدة القنوات الفضائية بدون أنترنت ؟
شـــاهد الفيديــو الـتالي الذي يستــعرض التــطبيق وكيفية تشغيله بالمجان وبدون أنــترنت أو رصيد للمكالمات .. فقط ب 0درهم ..
 الفيديو


https://docs.google.com/uc?export=download&id=0B3BbhSwgpRuYNnpLeVF1MFVTNDA


BELHiND TV تحميل التطبيق

الأحد، 24 يناير 2016

سلسلة دروس تعليم صيانة الكمبيوتر


تحميل VPN سريع ومجاني مدى الحياة 2016

ماذا لو قلت لك عندي لك طريقة من اجل ان تحصل على VPN مجاني مدى الحياة والاجمل انه لن يزعجك بالإعلانات كما هو الحال بالنسبة لبرنامج  hotspotshild. بل واكثر من ذلك ستختار بين عشرات السرڤرات  المحدثةبإستمرار ! ههه اليس  هذا حلم جميل ؟


أحصل على VPN سريع ومجاني مدى الحياة

نعم حلمك هو موجود في الواقع مع احترف :) فلقد توصلت إلى برنامج vpngate يمكنك من الحصول على VPN مجاني على اكثر من سرفر لعشرات من الدول من بينها اليابان ، فرنسا ، الولايات المتحدة الامريكية والعديد من الدول الاخرى كل هذا مجانا ! فقط مايجب عليك القيام به هو متابعة هذه الحلقة لان العبرة ليست في تحميل البرنامج بل في إعداده لهذا لكي لاتسبب في مشاكل شاهد هذه الحلقة للضرورة وإستمتعوا معنا !    أحصل على VPN سريع ومجاني مدى الحياة                  

 
تحميل vpngate.net

واتساب تضيف خاصية لمشاركة بياناتك مع فيسبوك

أضافت واتساب خيارا جديد على واجهة إعدادات التطبيق يتيح السماح بمشاركة بيانات المستخدم مع فيسبوك و ربط إتصال متبادل بين الجهتين.
وتدعو الرسالة المستخدمين للموافقة على ربط إتصال بين حسابات واتساب وفيسبوك بغرض "تحسين تجربة فيسبوك"، كما أنها تنبّه قبل موافقة المستخدم على هذا القرار أنّه لا رجعة فيه ولن يكون بإمكانه مستقبلا التراجع عن خيار الربط الذي وافق عليه.
ونشر المطور Javier Santos صورا لهذه الخاصية موضحا أنه استطاع اظهارها بشكل يدوي على الإصدار التجريبي من تطبيق الواتساب الذي يحمل رقم 4.12.413 بالتوجه إلى الشيفرة المصدرية والتعديل عليها باستخدام موجه الأوامر Terminal.
قد تكون هذه الخاصية إحدى الميزات التي ستساعد فيسبوك في مطابقة بيانات المستخدم التي سيؤكدها بنفسه بعد القيام بهذه الخطوة، وبالتالي القيام بمقارنة كلا الحسابين و التوصل للمعلومات الأكثر دقة عنه.
يذكر ان فيسبوك التي كانت قد استحوذت على تطبيق الواتساب خلال عام 2014 مقابل مبلغ 16 مليار دولار أكدت في ذلكم الحين إلى جانب واتساب انهما سيعملان بشكل منفصل، لكن يبدو أن الأمر قد يتغير مستقبلا.

الثلاثاء، 19 يناير 2016

Best 4 books in the world of Arduino

Best 4 books in the world of Arduino

-1-

Practical Arduino Cool Projects for Open Source Hardware

https://drive.google.com/open?id=0B1HQ0B8hfRtBY2MtTmJEa3hsM3M&authuser=0

-2-

All about Arduino Simulation

https://drive.google.com/open?id=0B1HQ0B8hfRtBUUJybmVTRmJtZ0k&authuser=0

-3-

Arduino Workshop A Hands-On Introduction with 65 Projects

https://drive.google.com/open?id=0B1HQ0B8hfRtBY2p5YmdKR2dEbDQ&authuser=0

-4-

Make Basic Arduino Project

Feb 2014
https://drive.google.com/open?id=0B1HQ0B8hfRtBME1LNkZXel81aTA&authuser=0

30 Arduino Projects for the Evil Genius


الجمعة، 1 يناير 2016

Summing amplifier using opamp.

Summing amplifier using opamp.

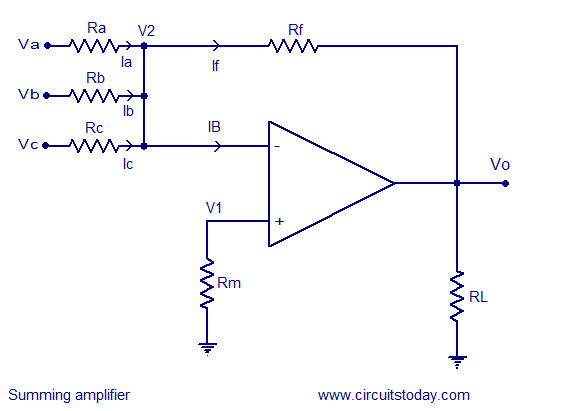
Summing amplifier is a type operational amplifier circuit which can be used to sum signals. The sum of the input signal is amplified by a certain factor and made available at the output .Any number of input signal can be summed using an opamp. The circuit shown below is a three input summing amplifier in the inverting mode.
opamp summing amplifier
Summing amplifier circuit
In the circuit, the input signals Va,Vb,Vc are applied to the inverting input of the opamp through input resistors Ra,Rb,Rc. Any number of input signals can be applied to the inverting input in the above manner. Rf is the feedback resistor.Non inverting input of the opamp is grounded using resistor Rm. RL is the load resistor. By applying kirchhoff’s current law at not V2 we get,
Ia+Ib+Ic = If+Ib
Since the input resistance of an ideal opamp is close to infinity and has infinite gain. We can neglect Ib & V2
There for Ia+Ib+Ic = If ……….(1)
Equation (1) can be rewritten as
(Va/Ra) + (Vb/Rb)+ (Vc/Rc) = (V2-Vo)/Rf
Neglecting Vo,
we get Va/Ra + Vb/Rb + Vc/Rc = -Vo/Rf
Vo = -Rf ((Va/Ra)+(Vb/Rb)+(Vc/Rc))
Vo = -((Rf/Ra )Va + (Rf/Rb) Vb + (Rf/Rc) Vc)……..(2)
If resistor Ra, Rb, Rc has same value ie; Ra=Rb=Rc=R, then equation (2) can be written as
Vo = -(Rf/R) x (Va + Vb +Vc)…………….(3)
If the values of Rf and R are made equal , then the equation becomes,
Vo = -(Va + Vb +Vc)
Averaging Circuit : An averaging circuit can be made from the above circuit by making the all input resistor equal in value ie; Ra = Rb = Rc  =R and the gain must be selected such that if there are m inputs, then Rf/R must be equal to 1/m.
Scaling amplifier :  In a scaling amplifier each input will be multiplied  by a different factor and then summed together. Scaling amplifier is also called a weighted amplifier. Here different values are chosen for Ra, Rb and Rc. The governing equation is  Vo = -((Rf/Ra )Va + (Rf/Rb) Vb + (Rf/Rc) Vc).
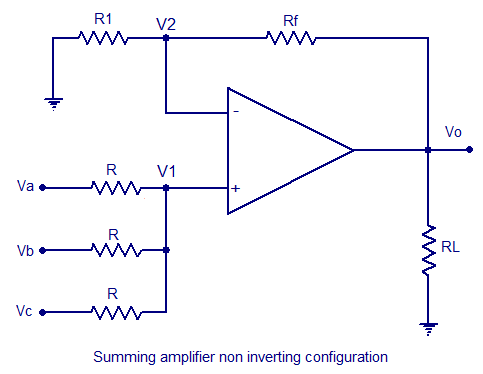
Summing amplifier in non inverting configuration.

summing amplifier non inverting configuration
Summing amplifier in non inverting configuration
A non inverting summing amplifier circuit with three inputs are shown above. The voltage inputs Va, Vb and Vc are applied to non inverting input of the opamp.  Rf is the feedback resistor. The output voltage of the circuit is governed by the equation;
Vo = (1+ (Rf/R1)) (( Va+Vb+Vc)/3)

الخميس، 24 ديسمبر 2015

Versatile 555 Schmitt Trigger /Logic Inverter /Level Translator

More undocumented applications for the 555 ‘oscillator:’ Not all applications oscillate as we will see. Most are knowledgeable about common CMOS logic inverters and Schmitt triggers such as the 74HC04 and 74HC14 respectively that come six in a DIP-14 package. Often, some sections are left over and can be used for future enhancements, etc. However, what do you do when only one additional inverter or increased output drive or signal level translation is required? This is where the ubiquitous 555 once again comes to the rescue.

Schematics
555 Schmitt Trigger Logic Inverter Level Translator
(555 Schmitt Trigger Logic Inverter Level Translator)
555 Level Translator Test Circuit
(555 Level Translator Test Circuit)
Inverter
The 555 is inherently an inverter. If the threshold inputs (pins 2 & 6) are tied together, they may be used collectively as the input with pin 3 being the output.
Schmitt trigger
Since the two thresholds (1/3 Vcc & 2/3 Vcc) are widely separated, they make a very good Schmitt trigger. You may recall that Schmitt triggers are often good at cleaning up noisy AC signals by separating the desired signal from the lower amplitude noise content. It is also extremely useful in converting a slow changing input voltage signal into a truly digital output (1 or 0), and without troublesome oscillation at the thresholds.
Input thresholds
1/3 Vcc & 2/3 Vcc are not always compatible with TTL logic levels. One clever way of making it compatible is to adjust the voltage at pin 5. For instance, setting pin 5 to 2.5V sets the upper threshed (“1” level) to 2.5V, and the low threshold (“0” level) to 1.25V thus making it TTL compatible. This may be accomplished via a simple voltage divider. By making its Thevenin resistance much lower than that of the internal divider (inside the 555), manufacturing tolerances are swamped thus making the voltage repeatable from device to device.
Input impedance
Input impedance is high and lends itself well to a simple R-C input filter that helps reject noise and prevent against potential ESD damage in applications where the input wiring is exposed to the real world environment.
Output drive capability
CMOS logic is hard put to source a 5mA output –It does better at sinking, but pales compared to the 100mA source /sink capability of the 555.
Range of power supply voltage
Vcc for the 74HC series is generally rated for 3 to 5V. The 555 can support up to 15V and can be mixed with 4000 series CMOS devices.
Open collector level translator
Pin 7 is an open collector output that can be applied as an interface to either higher or lower voltage logic devices –all that is required is the addition of a pull-up resistor that is tied to the secondary Vcc. Note that this is VERY undocumented and may not always work as expected, so please test and use common sense before going off the deep end in any design –especially, since the addition of a discrete MOSFET such as the 2N7000 will always do the job (with the addition of yet another inverter because the common source connection itself inverts the signal). Note that all of the 555 devices that I tested worked OK, including the CMOS TLC555. To test this feature, I constructed a simple test circuit and took oscillographs of the signals.
Pin 7 output discontinuity
While one device, an old SG555 worked acceptably, the oscilloscope displayed a discontinuity in the negative transition –See oscillograph. All the others were clean. This type of discontinuity or bounce in the output signal can raise havoc in high speed digital logic. In this case, the CD4013 D Latch is quite slow and forgiving.

الخميس، 17 ديسمبر 2015

Arduino & Raspberry Pi Camera Interface

Yes,we learned that we can take mobile phone camera modules from almost all mobile phones to inteface them with our advanced hobby electronics projects just as with any other standard add-on modules. Since this calls for an appropriate microcontroller, it is better to use Arduino or Raspberry Pi microcontroller as a utile platform.
Raspberry Pi camera
Recently I’ve received a Raspberry Pi camera board. The camera, comes with a ribbon cable already attached to it,is a small size (25mm x 20mm x 9mm) board where a fixed focus 5MP camera module is attached. Part number of the camera module (from OmniVision) is OV5647. At the heart of the OV5647 camera module is a 1/4” color CMOS QSXGA (5 megapixel) image sensor with OmniBSI ™ technology. This Raspberry Pi camera module can be used to take high definition video, as well as stills photographs. It is easy to use for novices, but has plenty to offer advanced users looking to expand the knowledge.
raspberry pi camera
(raspberry pi camera)
Raspberry PI comes with two first-rate connectors on board. One is between Ethernet and HDMI, and the other is near GPIO. The one closer to Ethernet connector is Camera Serial Interface (CSI ). This CSI is directly connected to the Raspberry Pi GPU which can process images without ARM intervention.
Camera Serial Interface
(Camera Serial Interface)
While connecting the camera module to the CSI port (located behind the Ethernet port) of the Raspberry Pi board,ensure that camera cable is inserted in right way, ie the blue strip in the flexible cable is towards the Ethernet (LAN) port. Once you are connected,enable the camera software, test the camera and try using it with Bash or Python. As I am a newbie in the Raspberry Pi world, I haven’t drudged enough into all features and capabilities of my borrowed Raspberry Pi (and the camera module). If you want to leap into the future of amazing possibilities, have a look at the documentation: http://www.raspberrypi.org/help/camera-module-setup/
The Raspberry Pi camera board transfers data through an extremely fast camera serial interface (CSI-2) bus directly to the system-on-chip (SoC) processor. It does this through a 15-pin ribbon cable, also known as flexible flat cable (FFC), and connects to the surface mount ZIF 15 socket in the Raspberry Pi board. As you may noted, the camera module on this official Raspberry Pi camera board is identical to the camera modules (ccd imagers) found in many mobile phones.
camera  data transmission interface
Luckily, most of the mobile phone cameras are not only MIPI compliant but also CSI compliant (see the first part of this article). The 15-pin Raspberry Pi CSI interface connector pinout is also included here to help you to keep proceed with your tinkering ideas. Note that, in Raspberry Pi, there are two flexible Flat Cable (FFC) connectors (S2 & S5). S2, near to the micro USB connector, is the Display Serial Interface (DSI). It allows low-level interfacing with LCDs and other displays with Raspberry Pi. It is a 15-pin surface mounted flexible flat connector, providing two data lanes, one clock lane, 3.3V and GND. S5, located between LAN and HDMI connector is the MIPI Camera Serial Interface 2 (CSI-2) connector for camera modules. It is a 15-pin surface mounted flat flexible connector, providing two data lines, one clock lane, bidirectional control interface compatible with I2C, 3.3V and GND. The data transmission interface in CSI is unidirectional differential serial interface with data and clock signals (the physical layer of this interface is the MIPI Alliance Standard for DPHY).
Arduino camera
Adding a camera to your Arduino UNO is not very difficult, because ArduCAM ™ Shield is infront of you. You can find a good tutorial on ArduCAM here: http://www.arducam.com/tutorial/. This tutorial will demonstrate how to use the ArduCAM shield on Arduino UNO board, aim the point and press a snapshot button you will get a BMP picture saved on the SD/TF card!
arduino camera arducam
ArduCAM shield hardware integrates all the necessary components to interface with camera modules. User only need a extra support camera modules and a TF/SD card to start image capture. The ArduCAM shield includes a ArduChip which handle complex timing between MCU and LCD, Camera, FIFO. It exports a standard SPI serial interface and can be interfaced with wide range of microcontrollers. Further, ArduCAM shield includes two sets of pin out, identical in function. One is Arduino standard, it can be well mate with standard Arduino boards like UNO, MEGA2560, Leonardo and DUE etc. The other one is alternative port which can be connect to any platform like Raspberry Pi. After the great success of ArduCAM shield Rev.B, the ArduCAM team now released a more powerful ArduCAM shield Rev.C with amazing new features. This revision supports camera modules including OV7660, OV7670, OV7675, OV7725, OV2640, OV3640, OV5642 and MT9D111.
(Tinker Hint: 16-pin camera connector in Nokia mobile phone 7380)
Did You Know? CMOS image sensor interface divided into two classes, one is DVP (Digital Video Port) interface, the other is MIPI Mobile Industry Processor Interface. The main difference between DVP and MIPI is that DVP is parallel interface and the MIPI interface is high speed differential serial interface. MIPI interface provide higher data band width than DVP interface and support higher resolution and frame rate.
camera modules
Image sensor is usually cheap and you can buy them for as little as $5.00 on eBay. However, when it turn into a “microcontroller-compatible camera module”, the finished board costs a lot more. In conclusion, I would have to say that it is worth spending time and effort to make your own camera modules, because the experience of reverse engineering and hacking is really interesting (at least for me). This is just a starting point, as promised I will come back with useful updates in near-future!

Mobile Phone Camera Interface Primer – 1

Today almost every mobile phone contains a camera. In principle, mobile phone camera is a sensor/camera module designed for use across a range of mobile phone handsets and accessories. It embeds high quality still camera functions and also supports rich video. For these camera modules designed to work with any host with a standardized camera interface, separate hardware accelerator device (coprocessor) can be integrated in the mobile phone system to run the associated image processing algorithms in hardware where the baseband cannot support this processing load.

Or these camera modules can be directly connected to a baseband or multimedia processor. No dedicated coprocessor is required in the second configuration because the image processing is done in software (or hardware) within the baseband processor. Ofcourse, you can take these cameras from mobile phones and inteface them yourself with your advanced hobby electronics projects just as with any other standard add-on modules. However, good knowledge in popular camera interface techniques is a prerequisite to proceed with your succeeding dream project.
MPC-1
Behind The Camera Interface
Because the companies that make mobile phone cameras and the companies that make the application processors are usually different, there is a need for standardization of the camera/application processor interface. MIPI (mobile industry processor interface) Alliance has been on top of this, and the main connection is a fast serial interface known as CSI (camera serial interface).
The mobile phone handset industry had a need for a standard interface to attach camera subsystems to a host device, such as an application processor. In response, MIPI developed CSI2 several years ago. The Camera Working Group – develops and maintains camera serial interface and supporting documents – released the CSI-2 v1.0 specification in 2005. The group produced CSI-3, a next generation interface specification based on the MIPI foundation of UniPortM, in 2012.
CSI-2 consists of a DPHY and a CSI-2 transmitter at the camera and receiver on the application processor. The DPHY provides the physical interface, and the transmitter and receiver cover encoding, packing, error handling, lane distribution, assembly of image data stream, etc. However, the increasing pixel count and frame-rate is driving the need for even higher bandwidth, hence CSI-3. CSI-3 has a new MPHY, and each MPHY has a bandwidth of up to 6Gb/s per lane, with up to 4 lanes. The next level up is the Unified Protocol layer (UniPro). This defines a unified protocol for connecting devices and components designed to have high speed, low power, low pin count, small silicon area high reliability and so on.
CSI-2: The “Camera Serial Interface2 Specification” defines an interface between a peripheral device (camera) and a host processor. The host processor (baseband, application processor) here denotes the hardware and software that performs essential core functions for telecommunication or application tasks. Two high-speed serial data transmission interface options are defined. The first option – referred to in this specification as the “DPHY physical layer option” – is a unidirectional differential interface with one 2-wire clock lane and one or more 2-wire data lanes. The physical layer of this interface is defined by the MIPI Alliance Specification for DPHY. The second high-speed data transmission interface option, -referred to in this specification as the “CPHY physical layer option”- consists of one or more unidirectional 3-wire serial data lanes, each of which has its own embedded clock. The physical layer of this interface is defined by the MIPI Alliance Specification for CPHY. The Camera Control Interface (CCI) for both physical layer options is a bidirectional (SDL-SDA) control interface compatible with the I2C standard.
csi 2
CSI-3: This interface technology is much easier to implement in both hardware and software than the existing technologies. CSI-3 is a new standardized data and control interface between the camera subsystem and the host device. Note that, within a camera subsystem, various components such as a RAW camera sensor, an SoC (system – on a – chip) camera, or a multi-chip camera module can be connected to each other using a proprietary interconnect, or CSI-3.
csi 3
The VX6953CB Camera Module
The VX6953CB 5.1 megapixel EDOF (Extended depth of field) camera module (from ST) is designed for use across a range of mobile phone handsets and accessories. It embeds high quality still camera functions and also supports HD video. VX6953CB produces raw Bayer 5 Mpixel images at 15 fps in RAW10, and supports the CCI control as well as CCP 2.0 and CSI-2 (D-PHY v1.0 compliant) data interfaces. As stated, the VX6953CB has both CCP2.0 and MIPI CSI-2 video data interfaces selectable over the camera control interface (CCI).
The image data is digitized using an internal 10-bit column ADC. The resulting pixel data is output as 8-bit, 10-bit or 10-8 bit compressed data and includes checksums and embedded codes for synchronization. The interface conforms to both the CCP 2.0 and MIPI CSI-2 interface standards. The sensor is fully configurable through a CCI serial interface. The module is available in a SMOP (small optical package) type package measuring 6.5 x 6.5 x 4.6 mm. It is designed to be used with a board-mounted SMIA65 (standard mobile imaging architecture) socket or flex cable.
VX6953CB Camera Module
Pinout and pin description of VX6953CB camera module, as viewed from the bottom of the module, is shown below. In the pinout table, note that pads T1-T8 are ST Test Points.
Since only a minimal list of external components is required, the VS6953CB features allow straight forward integration into custom-designs. VS6590 is another near-similar camera module from ST, but with only 0.5 Megapixel resolution (800Hx600V)and CCP 1.0 serial video interface.
  • CCP → CCP stands for Compact Camera Port, the interface standard for portable cameras, developed by SMIA (standard mobile imaging architecture) -an organization promoting the standardization of mobile phone (cellphone) interfaces.
  • CCI → This is usually a two or three-wire interface used to control the sensor module. Though named differently by different vendors (e,g. Serial Camera Control Bus, SCCB by Omni Vision), it usually confirms to the I2C standards (defined by Philips).
  • SMIA → SMIA (Standard Mobile Imaging Architecture) is an imaging architecture especially suitable for mobile application use. The scope of SMIA covers a raw bayer output image sensor head: It specifies housing, mechanical interconnection, functionality, register set and electrical interface
In the next figure, you can see the camera wiring in a Nokia 2700C (Nokia 2700c2 RM-561) mobile phone circuitry. In the schematic diagram, the 12-pin camera connector is labelled as X3300. The camera module can be safely removed from this connector/socket using a special “Nokia Camera Remover Tool”, available as a service accessory. For more details, refer the official service documentation/service schematics published by NOKIA™.
Nokia 2700C camera wiring
Note!
This article is based on an ongoing R&D work, now live @ TechNode PROTOLABZ. Although it is a commercial project,the project will be solely published (sometime later) in electroschematics.com
(R&D @ TechNode PROTOLABZ)
Referenced Documents (including but not limited to):
  • MIPI Alliance Standard for Camera Serial Interface 2 (CSI-2) v1.0
  • MIPI Alliance D-PHY Specification (v00-90-00)
  • High-Speed interface Technology for Image Data Transmission (FIND Vol.26)
  • Camera Sensor Driver Development and Integration (PATH PARTNER)
  • SMIA 1.0 Introduction and Overview (NOKIA & ST)
  • Arasan’s White Papers & Articles
Part 2 → Mobile Phone Camera and Arduino/Raspberry Pi

الأربعاء، 16 ديسمبر 2015

Delayed Automatic Power OFF

This circuit is build with the 555 IC and will automatically turn off the power after 20 minutes. You can use the circuit to turn off the porch light after you lock the house or similar other uses.

The 555 timer is operated as a monostable and a momentary push on S1 switch makes the output go high which triggers the triac and makes power available in the socket.
The IC output goes low again when C2 has charge up to 2/3 of the supply voltage. This process takes about 20 minutes. C2 should have low leakage otherwise it will charge very slowly and in cases of excessive leakages may not charge to full value at all. Power supply for the timer is provided by half wave rectifier D1, voltage dropping resistor R1, zener diode D2 and filter capacitor C1.

Automatic Turn OFF Power Circuit Schematic

automatic turn off power schematic

Versatile 555 Schmitt Trigger /Logic Inverter /Level Translator

More undocumented applications for the 555 ‘oscillator:’ Not all applications oscillate as we will see. Most are knowledgeable about common CMOS logic inverters and Schmitt triggers such as the 74HC04 and 74HC14 respectively that come six in a DIP-14 package. Often, some sections are left over and can be used for future enhancements, etc. However, what do you do when only one additional inverter or increased output drive or signal level translation is required? This is where the ubiquitous 555 once again comes to the rescue.

Schematics
555 Schmitt Trigger Logic Inverter Level Translator
(555 Schmitt Trigger Logic Inverter Level Translator)
555 Level Translator Test Circuit
(555 Level Translator Test Circuit)
Inverter
The 555 is inherently an inverter. If the threshold inputs (pins 2 & 6) are tied together, they may be used collectively as the input with pin 3 being the output.
Schmitt trigger
Since the two thresholds (1/3 Vcc & 2/3 Vcc) are widely separated, they make a very good Schmitt trigger. You may recall that Schmitt triggers are often good at cleaning up noisy AC signals by separating the desired signal from the lower amplitude noise content. It is also extremely useful in converting a slow changing input voltage signal into a truly digital output (1 or 0), and without troublesome oscillation at the thresholds.
Input thresholds
1/3 Vcc & 2/3 Vcc are not always compatible with TTL logic levels. One clever way of making it compatible is to adjust the voltage at pin 5. For instance, setting pin 5 to 2.5V sets the upper threshed (“1” level) to 2.5V, and the low threshold (“0” level) to 1.25V thus making it TTL compatible. This may be accomplished via a simple voltage divider. By making its Thevenin resistance much lower than that of the internal divider (inside the 555), manufacturing tolerances are swamped thus making the voltage repeatable from device to device.
Input impedance
Input impedance is high and lends itself well to a simple R-C input filter that helps reject noise and prevent against potential ESD damage in applications where the input wiring is exposed to the real world environment.
Output drive capability
CMOS logic is hard put to source a 5mA output –It does better at sinking, but pales compared to the 100mA source /sink capability of the 555.
Range of power supply voltage
Vcc for the 74HC series is generally rated for 3 to 5V. The 555 can support up to 15V and can be mixed with 4000 series CMOS devices.
Open collector level translator
Pin 7 is an open collector output that can be applied as an interface to either higher or lower voltage logic devices –all that is required is the addition of a pull-up resistor that is tied to the secondary Vcc. Note that this is VERY undocumented and may not always work as expected, so please test and use common sense before going off the deep end in any design –especially, since the addition of a discrete MOSFET such as the 2N7000 will always do the job (with the addition of yet another inverter because the common source connection itself inverts the signal). Note that all of the 555 devices that I tested worked OK, including the CMOS TLC555. To test this feature, I constructed a simple test circuit and took oscillographs of the signals.
Pin 7 output discontinuity
While one device, an old SG555 worked acceptably, the oscilloscope displayed a discontinuity in the negative transition –See oscillograph. All the others were clean. This type of discontinuity or bounce in the output signal can raise havoc in high speed digital logic. In this case, the CD4013 D Latch is quite slow and forgiving.
Will 555 applications ever be exhausted? NO!

الثلاثاء، 15 ديسمبر 2015

Remote AC Power Control by Android Application with LCD Display

The project is designed to control AC power to a load by using firing angle control of thyristor. Efficiency of such power control is very high compared to any other method.
Remote operation is achieved by any smart-phone/Tablet etc., with Android OS, upon a GUI (Graphical User Interface) based touch screen operation. The project uses zero crossing point of the waveform which is detected by a comparator whose output is then fed to the microcontroller. The microcontroller provides required delayed triggering control to a pair of SCRs through opto isolator interface. Finally the power is applied to the load through the SCRs in series. This project uses a microcontroller from 8051 family which is interfaced through a Bluetooth device, which receives signal from Android application device for increasing or decreasing the AC power to the load. A lamp is used in place of an induction motor whose varying intensity demonstrates the varying power to the motor. The varying power results in variation in speed of the motor.
The project can be further enhanced by using direct 230 volt supply instead of 12 volt AC to the bridge rectifier for achieving higher voltage control for charging number of batteries in series.
Complete project information- Remote AC Power Control by Android Application with LCD Display

Project Description

Based on the principle of firing angle control of two thyristors connected in anti parallel is fed for the output from an embedded microcontroller circuit having LCD display. The firing angle is remotely controlled to get reduced load power in steps.
Figure:1 Remote AC Power Control by Android Application with LCD Display

Figure 1  Remote AC Power Control by Android Application with LCD Display

Figure:2 Remote AC Power Control by Android Application with LCD Display

Figure 2  Remote AC Power Control by Android Application with LCD Display

Figure:3 Block Diagram

Fire Fighting Robot Remotely Operated by Android Applications

The project is designed to develop a fire fighting robot using android application device for remote operation. The robotic vehicle is loaded with water tanker and a pump which is controlled over wireless communication to throw water. An 8051 series of microcontroller is used for the desired operation.
At the transmitting end using android application device, commands are sent to the receiver to control the movement of the robot either to move forward, backward and left or right etc. At the receiving end three motors are interfaced to the microcontroller where two of them are used for the movement of the vehicle and the remaining one to position the arm of the robot. Remote operation is achieved by any smart-phone/Tablet etc., with Android OS, upon a GUI (Graphical User Interface) based touch screen operation. The android application device transmitter acts as a remote control that has the advantage of adequate range, while the receiver have Bluetooth device fed to the microcontroller to drive DC motors via motor driver IC for necessary work. A water tank along with water pump is mounted on the robot body and its operation is carried out from the microcontroller output through appropriate signal from the transmitting end. The whole operation is controlled by an 8051 series microcontroller. A motor driver IC is interfaced to the microcontroller through which the controller drives the motors.
Further the project can be enhanced by interfacing it with a wireless camera so that the person controlling it can view operation of the robot remotely on a screen.
Complete information about project - Fire Fighting Robot Remotely Operated by Android Applications

Project Description

The project is designed to develop a fire fighting robotic vehicle using motors those are interfaced to a microcontroller through remotely operated commands to it by touch screen based user friendly GUI on any smart phone with Android applications. The robotic vehicle is loaded with water tanker and a pump which is also controlled remotely too pump the water on the fire.
Figure:1 Fire Fighting Robot Remotely Operated by Android Applications

Figure 1  Fire Fighting Robot Remotely Operated by Android Applications

Figure:2 Fire Fighting Robot Remotely Operated by Android Applications

Figure 2  Fire Fighting Robot Remotely Operated by Android Applications

Figure:3 Block Diagram

Remote Operated Domestic Appliances Control by Android Application

The project is designed to operate electrical loads using an Android application device. The system operates electrical loads depending on the data transmitted from the Android application device. Operating conventional wall switches is difficult for elderly or physically handicapped people. This proposed system solves the problem by integrating house hold appliances to a control unit that can be operated by an Android smart-phone/Tablet etc.
Remote operation is achieved by any smart-phone/Tablet etc., with Android OS, upon a GUI (Graphical User Interface) based touch screen operation, interfaced to the microcontroller of 8051 family. The program on the microcontroller serially communicates with Bluetooth device to generate respective output based on the input data (sent from Android application device) to operate a set of relays through a relay driver IC. The loads are interfaced to the control unit through the relays. The system can be used in existing domestic area for either operating the loads through conventional switches.
The power supply consists of a step down transformer 230/12V, which steps down the voltage to 12V AC. This is converted to DC using a Bridge rectifier. The ripples are removed using a capacitive filter and it is then regulated to +5V using a voltage regulator 7805 which is required for the operation of the microcontroller and other components.

Project Description

The project is designed to operate electrical loads using relays interfaced to a microcontroller through remotely operated commands to it by touch screen based user friendly GUI on any smart phone with Android applications.
Figure:1 Remote Operated Domestic Appliances Control by Android Application

Figure 1  Remote Operated Domestic Appliances Control by Android Application

Figure:2 Remote Operated Domestic Appliances Control by Android Application

Figure 2  Remote Operated Domestic Appliances Control by Android Application

Figure:3 Block Diagram

8-bit Bin to 256 /1 of 256

A long time ago when a parallel printer port was the standard, i was thinking how to get the most led's on a 8 bit interface. And came up with a simpel way to demultiplex. It can be used with dip-switches or any other 8 bit interface like a usb i/o interface. I made a 256 run light using two 74hct193 and a 74hct132. The resistor can/need to be matched by what type of led's and power you use. Parts are still available in Europe, for the usa don't know , but i think no problem. I just hooked it up an Arduino, via an 74hc595. Works fine, programing is not so hard as i thought. Never used a micro controler before.

Project Description

I made a compact disign by using 2 standard PCB’s, 16 BC557AP and two 74154N ‘s
Figure:1 Circuit diagram

Figure 1  Circuit diagram

Figure:2 Front

Figure 2  Front

Figure:3 Back

Figure 3  Back

I just hooked it up an Arduino, via an 74hc595.
Works fine, programing is not so hard as i thought.
Never used a micro controler before.
Figure:4 Hooked to an Arduino

Figure 4  Hooked to an Arduino

Twitter Delicious Facebook Digg Stumbleupon Favorites More